My incredibly cool nephew was turning double digits! To commemorate the decade long accomplishment I told him I would make his birthday cake. He wanted a Lego cake and I had no idea where to begin. But, I was determined to make him the best Lego cake ever. After a couple hours on Pinterest and a half dozen crumpled up sketches, I had come up with a plan!
Lego Head Cake
Estimated Servings 48
- (4) 10″ cakes – equates to 4 cake mixes if you are using boxed cake mixes
- (3) jars of frosting
- Yellow dye – I used Wiltons Buttercup Yellow
- Cake board – cutting board or sturdy cardboard will do if you don’t want to buy a cake board. Better yet, use a green Lego base. I will definitely do this next time!
- Wilton Chocolate Melts in a variety of colors
- Silicone Lego mold
- Waxed paper
- Wiltons Sugar Sheets
Lego Pieces
- I started with a variety of Wilton Chocolate Melts and a Silicone Lego Mold
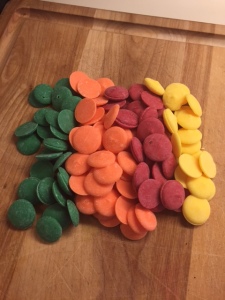
- Melt one color of chocolate at a time over low heat, stirring almost constantly

- I tried several methods of filling the mold with chocolate, but I found it was easiest to use either a pastry bag or bottle and a small circle writing tip.

- Place tray in freezer to harden
- In total I made 24 Lego pieces, but you can play with that quantity


Lego Head Cake
Day Before Party – Make Cakes
- I started by making four 10″ cakes. My nephew wanted vanilla, but any flavor will work. In hindsight, I would have dyed the cake batter yellow to match the frosting.
- I cut a circle roughly 6″ in diameter in 2 of the cakes.
- Wrap cakes separately in waxed paper and freeze.
Click here for tips on how to bake cakes flat so they are easier to stack.
Day of Party – Decorate!
- Remove cakes from freezer and stack – full cake on the bottom and the two cakes with the centers cut out on top.
- Fill open center with Lego pieces, saving a few pieces to decorate the outside

- Cover the opening with the 4th full cake and top with one of the 6″ circles you cut out to make room for the Legos

- Mix 1/2 a container of frosting with 1/8 cup of water. The first layer of frosting will serve as the crumb coat to keep the crumbs in tack and out of your way when you decorate. When you have covered the cake with a thin crumb coating, refrigerate for 1 hour or until the crumb coating is firm.
- While the crumb coat is setting mix together the remaining frosting and some of the yellow dye until you have achieved a bright, vibrant yellow.
- Use the sugar sheet to cut out the facial features. This was my first time using sugar sheets and they were incredibly easy to use. I used kitchen scissors to cut just as if I was cutting paper. They can let even a novice cake decorator, such as myself, look (or at least feel) like a pro!
- When the crumb coat has set, cover the cake with a layer of yellow frosting
- Complete by adding the facial features made from the sugar sheets and garnish with a few additional Lego pieces
- Now for the fun party – ENJOY!


This is genius!! I love your process. So cute! Happy birthday to your nephew!
Desirée | preperie.com
LikeLike
Thank you so much for visiting and the kind words! Heidi Melissa
LikeLike
This is very impressive. You did a very good job. I am sure the young man was thoroughly tickled with his cake 🙂 What a nice auntie you are
LikeLike
Fabulous!!
LikeLike
Oh this looks wonderful! I love making cakes for my grandchildren’s birthdays so this will be on the list for one of my grandsons for sure. Thanks for sharing with us at #AnythingGoes link up
LikeLiked by 1 person
Thanks for sharing this amazing cake with us at #WednesdaysWisdom. I didn’t mention in my previous post that my 33 y.o. son would love this as well!
LikeLiked by 1 person
I am impressed! What an ingenious idea! Great job.
LikeLiked by 1 person
Thank you so much for visiting and the kind words! I really is MUCH easier than it looks 🙂
LikeLike
Loving this cake! It’s so cute! Thanks so much for sharing at Inspiration Thursday. Have a great week!
LikeLike
This is an awesome addition to a Lego party! I don’t think I’d want them to eat it after working so hard on it though, lol!
LikeLiked by 1 person
Ha – cutting it was a little painful, but bathe kids were all excited to that helped 🙂
LikeLike
This is absolutely brilliant- Legos and cake- what’s not to love?
LikeLiked by 1 person
Thank you so much for visiting! It was a ton of fun to make & watching the kids reaction was priceless!
LikeLike
I might need to make that for my husband’s next birthday.
LikeLiked by 1 person
That’s great! It was actually a ton of fun to make!
LikeLike
Now I am hooked! I loved this blog. My Grandson will think I am the best Grammie on earth! I have almost a year to practice.
LikeLiked by 1 person
You made my day – thank you! I promise it is way easier than it looks. I love to cook, but I’ve just started to dip a toe into baking & consequently found a new love 🙂
LikeLike
Hi there! Just stopping by to let you know you were in my top two picks at the #AnythingGoes link up this week. Congratulations and see you next week!
LikeLike
Oh my gosh – THANK YOU!
LikeLike
This is brilliant – he must have been over the moon!
I kind of want one for my birthday now… I think I might be a little old for it though!
The Crazy Stork Lady | http://www.breakingupwithcontraception.com
LikeLike
Oh wow! How cute! You are very talented. Thanks for sharing on #ToddlerFunFriday!
LikeLike
This is cute – I’m pinning it to save in case one of my kids decides they want a lego party someday!
LikeLike
SO CUTE!! You have such great ideas! Im pinning these to our Made For Kids Pinterest Board and my personal one. Love it! Thanks so much for sharing with #made4kids!
LikeLike
That is amazing! This year we had a TARDIS printed on the cake. A couple of years ago we put Bambino’s face on Emmet from The Lego Movie with the phrase “Everything is awesome!” over him. I love fun cakes! Thanks for sharing this! I might make it ‘just because’!
LikeLike
P.S. I just noticed that this was posted on my birthday last year! Coincidence? I think not. 😀
LikeLike
Oh no – it looks like you have a birthday coming up. I’m going to have to work on a new cake post for this September 🙂
Thanks for visiting!
LikeLiked by 1 person
I’ll keep an eye out for it! ❤
LikeLike